All posts by dimitris

Sitemap & Sitemap Index xml files using php and mysql

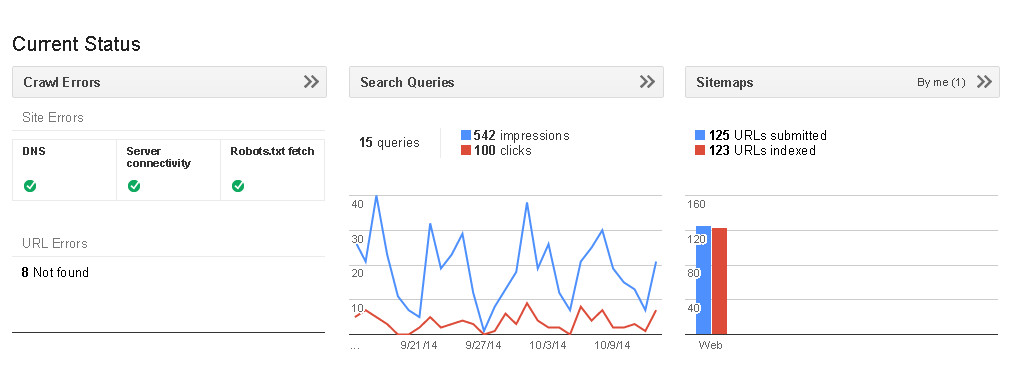
For some time now I have been generating sitemap xml files for google submission using Microsoft Excel. Always knew that there would be a way to generate it on the fly/on request and never bother with that again. But how?

Documentation is not very clear because you need to use multiple programming languages, and also because the whole xml validation process seems very sensitive to errors. Since i am not an experienced programmer, stack exchange became my guide and i have finally managed to do it.

If you have multiple pages, you probably need to create intermediate xmlindex pages. These are basically specially marked index files that point to other index files. Warning: Nested xmlindex files are not allowed by Google (even though are at the end followed and indexed).

<?php Header('Content-type: text/xml');

require_once('../Connections/localhost.php'); 

if (!function_exists("GetSQLValueString")) {
function GetSQLValueString($theValue, $theType, $theDefinedValue = "", $theNotDefinedValue = "") 
{
 if (PHP_VERSION < 6) {
 $theValue = get_magic_quotes_gpc() ? stripslashes($theValue) : $theValue;
 }

 $theValue = function_exists("mysql_real_escape_string") ? mysql_real_escape_string($theValue) : mysql_escape_string($theValue);

 switch ($theType) {
 case "text":
 $theValue = ($theValue != "") ? "'" . $theValue . "'" : "NULL";
 break; 
 case "long":
 case "int":
 $theValue = ($theValue != "") ? intval($theValue) : "NULL";
 break;
 case "double":
 $theValue = ($theValue != "") ? doubleval($theValue) : "NULL";
 break;
 case "date":
 $theValue = ($theValue != "") ? "'" . $theValue . "'" : "NULL";
 break;
 case "defined":
 $theValue = ($theValue != "") ? $theDefinedValue : $theNotDefinedValue;
 break;
 }
 return $theValue;
}
}

mysql_select_db($database_localhost, $localhost);
$query_Recordset1 = "select * from sitemaps where `use`='sitemap'";
$Recordset1 = mysql_query($query_Recordset1, $localhost) or die(mysql_error());
$row_Recordset1 = mysql_fetch_assoc($Recordset1);
$totalRows_Recordset1 = mysql_num_rows($Recordset1);
$xml=new SimpleXMLElement('<?xml version="1.0" encoding="UTF-8" standalone="yes"?>'
 .'<sitemapindex xmlns="http://www.sitemaps.org/schemas/sitemap/0.9">'
 .'</sitemapindex>'); 
do { $url=$xml->addChild('sitemap');
 $website="http://www.tharsitis.gr/".strtolower(str_replace(' ','-',$row_Recordset1['url']));
 $url->addChild('loc',$website);
 "<br/>";
 //$url->addChild('lastmod','XXXXXXXX'); OPTIONAL
 } while ($row_Recordset1 = mysql_fetch_assoc($Recordset1));
mysql_free_result($Recordset1);
print($xml->asXML());
?>

This is the xml sitemap  index code that worked for me. I created the database recordset using Dreamweaver. It retrieves all the xml index urls from Mysql database.

At the second part of the project i needed to generate the sitemap xml files that the xml index would be point at.

This is the code that worked for me:

<?php Header('Content-type: text/xml');

require_once('../Connections/localhost.php'); 

if (!function_exists("GetSQLValueString")) {
function GetSQLValueString($theValue, $theType, $theDefinedValue = "", $theNotDefinedValue = "") 
{
 if (PHP_VERSION < 6) {
 $theValue = get_magic_quotes_gpc() ? stripslashes($theValue) : $theValue;
 }

 $theValue = function_exists("mysql_real_escape_string") ? mysql_real_escape_string($theValue) : mysql_escape_string($theValue);

 switch ($theType) {
 case "text":
 $theValue = ($theValue != "") ? "'" . $theValue . "'" : "NULL";
 break; 
 case "long":
 case "int":
 $theValue = ($theValue != "") ? intval($theValue) : "NULL";
 break;
 case "double":
 $theValue = ($theValue != "") ? doubleval($theValue) : "NULL";
 break;
 case "date":
 $theValue = ($theValue != "") ? "'" . $theValue . "'" : "NULL";
 break;
 case "defined":
 $theValue = ($theValue != "") ? $theDefinedValue : $theNotDefinedValue;
 break;
 }
 return $theValue;
}
}

$rs1_Recordset1 = "-1";
if (isset($_GET['id'])) {
 $rs_Recordset1 = strtolower(str_replace ( '-', ' ',$_GET['id']));
}

mysql_select_db($database_localhost, $localhost);
$query_Recordset1 = sprintf("SELECT packbrand,packsuuid,packcollection,packsname,folder FROM packs where collectionid=%s and visible='1' order by serial asc",GetSQLValueString($rs_Recordset1, "text"));
$Recordset1 = mysql_query($query_Recordset1, $localhost) or die(mysql_error());
$row_Recordset1 = mysql_fetch_assoc($Recordset1);
$totalRows_Recordset1 = mysql_num_rows($Recordset1);
$xml=new SimpleXMLElement('<?xml version="1.0" encoding="UTF-8" standalone="yes"?>'
 .'<urlset xmlns="http://www.sitemaps.org/schemas/sitemap/0.9" xmlns:image="http://www.google.com/schemas/sitemap-image/1.1">'
 .'</urlset>'); 
do { 
 $brand=$row_Recordset1['packbrand'];
 $collection=$row_Recordset1['packcollection'];
 $url=$xml->addChild('url');
// $image="image:image";
 $website="http://www.tharsitis.gr/".strtolower(str_replace(' ','-',$brand."/".$collection."/".$row_Recordset1['packsuuid']));
 $img="http://www.tharsitis.gr/packagecache/".$row_Recordset1['folder']."/".$row_Recordset1['packsuuid'].".jpg";
 $url->addChild('loc',$website);
 $url->addChild('priority','0.7');
 $image = $url->addChild('image:image', null, 'http://www.google.com/schemas/sitemap-image/1.1');
 $image->addChild('image:loc',$img, 'http://www.google.com/schemas/sitemap-image/1.1');
 $image->addChild('image:caption',$row_Recordset1['packsname'], 'http://www.google.com/schemas/sitemap-image/1.1');
 } while ($row_Recordset1 = mysql_fetch_assoc($Recordset1));
mysql_free_result($Recordset1);
print($xml->asXML());
?>

In both files you can skip the initial part where i build the recordset. This was all done automatically by Dreamweaver. Save the files as php files.
Finally, i needed to modify my .htaccess file so that it translated every php  request matching the above files to xml. This is a requirement to get Google validate the files correctly.

Rewriterule ^xmlindex.xml$ /xml/xmlindex.php [L]
Rewriterule ^p(.*).xml$ /xml/xmlpacks.php?id=$1 [L]

As you can see in the second line of the below htaccess code, I use url variables to generate dynamic xml sitemaps for different sets of urls.  Vuala!

Panorama Made using Photoshop – Lake Vegoritida

Lake Vegoritida Panorama using Photoshop and fixed exposure photos taken with my Nikon.

Vegoritida-Lake-panorama


Exact Location:

Photomerge is a great functionality of photoshop to create panorama pictures as long as the source images have the same exposure, otherwise it gets confused. To get sequential photos with the same exposure i just half press the photo button on my nikon, so as to lock the exposure, and as i move my body form left to right i press it down with our fully releasing it though. This allows to photometer hust once, in the first photo, and take the rest of them with the same settings.

Now in Photoshop the process is automated. Just import the set of images using the correct menu.

Select the appropriate menu..

Photoshop Photomerge Menu

And import the set of pictures. Photoshop does the rest.

Photoshop Photomerge Menu

On the specific panorama i messed up the levels a bit.

MySQL Max grouping wrongly the data

mysql database
mysql database

I was trying to build a mysql image gallery, and for that reason i wanted to retrieve the largest value, according to a specific column, which would be smaller than a url variable i would retrieve from the user interface. This is the MySql command i used initially and which retrieved wrong results:

select max(idpacks), packuuid FROM table  where idpacks<"60" ;

which returned the following results:

# max(idpacks), packsuuid
'59', '0e1fdf98b90011e48438d067e54001ba'

The problem:

Even though the value 59 in the above result is the correct one, the packuuid does not correspond to the same row. Digging in a bit i found that it actually corresponds to the row which has the smallest idpacks value.  This took me all day to figure out 😀

The cause:

Quoting from web:

MySQL actually permits that an aggregate query returns columns not used in the aggregation (i.e. not listed in GROUP BY clause). It could be considered as flexibility, but in practice this can easily lead to mistakes if a person that designs queries does not understand how they will be executed

So I needed to modify the query.  My SQL query skills are not the best so bare with me. This is the solution I found to get the values i needed to the same row:

SELECT idpacks,packsuuid FROM packs  where idpacks=(select max(idpacks) from packs  where idpacks<"60" );

Which returned the correct values (correct packsuuid for idpacks 59):

# idpacks, packsuuid
'59', '0f6914f0b90011e48438d067e54001ba'

Worked for me!

How to Crop and Resize multiple scanned photos using photoshop

From time to time I discover in my stuff old photos from high school that need to be digitalized in order to be saved from my toddlers menace. 😀

 crop and resize multiple scanned photos using photoshopDoing this was some how tiresome because even though I have automated the scanning and saving, using a Dropbox linked scanner from Epson, the photos must be further processed in order to be up to my standards and get saved to my archive.

What I used to do, is to manually crop and resize these photos using the crop tool from Photoshop. I did not know though, that Photoshop has already solved this under the File>Automate menu with the “Crop and Straighten Photos Menu”.

As soon as you open the scanned image/s in Photoshop and  run the process, Photoshop does it all for you, even when you have multiple images in the document.  All ready to be saved!

Saved my lots of time. Time to finally process those old scanned photos cluttering my Dropbox.


Upgrade Openelec 3x To Release 4x

openelec_logo_notype_512x512_zps868a4882[1]
I have been blessed with an exceptional xbmc openelec setup for the past year, which i use in coordination with my Synology NAS to watch movies and series at home. After one year though i decided to upgrade my 3x Openelec version to the latest one. This is a short guide on how to do this, if your unix commands are on average. FYI, the below are based on knowledge found in many forums and troubleshooting pages.

  1. Make sure you download the latest openelec release from the official web site.  Choose Raspberry Pi builds, and then select your the release you like (i selected [Diskimage] OpenELEC Stable – Raspberry Pi ARM Version:4.2.1). Unzip the release and copy the copy KERNEL, KERNEL.md5, SYSTEM and SYSTEM.md5 from the target folder.
  2. Make sure you access openelec from the network using UNC (\\192.168.1.30). In order to do so, enable SAMBA from the openelec settings. Copy the copied files from #1 inside to the update folder. (\\192.168.1.30\update). In my case i go the error that there was not enough space for the new files to be copied, even though the SD card is a 32Gig SD.  If you did not get any error, then you are done, restart openelec and you are upgraded. If you got the not enough space error though, proceed to next step, to increase the space on the storage of the openelec.
  3. Referenced from here, I opened an ssh connection to my openelec using putty. Pretty simple process if you have not done that before. Use “root” as username, “openelec” as password. Type the following :

Switch to root partition

  1. cd /        

Keep xbmc from restarting

  1. touch /var/lock/xbmc.disabled

Stop XBMC, so we can unmount /storage

  killall -9 xbmc.bin
  umount /storage

If you get an error on the above command that means that the storage cannot be un-mount, because some other process is using it.

Run the below to see what process is using the storage and write down the numbers of them. lets say 871 and 9131

fuser -m /storage

Now kill them!!!, and unmount storage.

kill -9 871 and 9131 && umount /storage

Alternatively you could also use the “top” command to see what these processes are.

Once you have killed all processes that use storage and unmounted it, run the following:

Verify mounts:

mount
parted /dev/mmcblk0

Change to dislpay sectors:

unit s

 Show partitions, make note of starting sector of your partition

p

remove the partition

rm 2

recreate it using same starting sector number and ending in “-1” to use remaining space:

mkpart primary 258048 -1
quit parted
e2fsck -f /dev/mmcblk0p2
resize2fs /dev/mmcblk0p2
mount /dev/mmcblk0p2 /storage
df -h
rm /var/lock/xbmc.disabled

Reference Pages:

http://wiki.openelec.tv/index.php?title=Updating_OpenELEC

https://raspberrypi.stackexchange.com/questions/8625/resize-file-system-on-openelec

Howto-samba-img1[1]Howto-samba-img1[1]

The importance of sitemap.xml

Google Webmaster Tools Menu


A colleague of mine recently announced to me that he and a couple of his friends  hired a software company to develop a web site for them. Curious as i am i visited the web site directly and started searching inside the code to find out which platform they used, if they have social integration, SEO tags etc. It turned out that none of these was present due the fact that it`s just a start up site, and the budget was not enough to cover for all of this. All ok but at least i think they should have added their newly created website to the webmaster tools of Google and Bing.

According to my opinion even if  it is a start up site, you need to use webmaster tools to let Google and Hotmail know that you are already running, and so that they can start indexing the individual web pages you have. For that reason you need to create a sitemap file and place it on the root of the www. I usually name these files sitemap.xml and either create them by hand or by application modules (like in wordpress for example). Keep in mind that google needs to have an xml file as a sitemap and not a php page that would generate xml formatted text, not being able to find a solution to this yet.

Google Webmaster Tools
Bing Web Master Tools Menu

The benefits are numerous.  You can check your page in terms of structured data, linked pages, coding errors. You also can see different statistics of your web page such as inbound, outbound links as well as search queries. Google additionally also lets you see the indexing status of your submitted sitemaps as well as some keyword preference based on the submitted urls. Finally, on the relative submenu, you are able to monitor the google crawler as it crawls your web site for errors, and also be able to see how Google “reads” your web page, by using the “Fetch as Google” functionality.

Bing webmaster tools provides matching functionality, combining some “analytics” type data though. e.g SEO Analyzer, Link Explorer, Page Traffic etc.

Closing this, I strongly believe that creating a sitemap and adding it to Bing /Google webmaster tools is one of the first actions a webmaster should do, after going public. These are great tools that guarantee you that the big players in search engines can “see” you good.

Google Web Master Tools

Bing Web Master Tools

SEO Must haves that apply to any web page

Update: Yandex also has a Webmaster Tool for their search engine. Check it out

cassino glaces

Glaces_Yellow_tharsitis.grThis is one of my first photos taken in Brussels Belgium, outside the Atomium.

I didn`t really like the atomium, too much waiting time and nothing special to see. I would not recommend it to anyone, if they needed to wait as much i did to get in. Anyway the photo is from a VW car selling icereams outside the Atomium, and it seemed interesting while waiting in the queue.. I`ve done some photoshoping and some HDRing over there.

Udemy Online Certificates

udemy-logo-academyofyoublog[1]There is a huge discussion on whether the online training websites should provide a certificate of completion or not (here). I will not spend any time repeating all these that are mentioned in the above link. There is no point in doing it. From my side i totally agree that fast forwarding the udemy training videos does not prove anything. It does not prove that i am capable of taking great photos or web developing in dreamwaver or anything..but…

It felt real good when i finished my first udemy online training on the advanced photo taking techniques, and udemy sent me a certificate of completion.

After all, doesn`t google also provide a certificate of completion for watching  ten videos of how to set up analytics, and then a stupid questionnaire? Yes they do. So there is nothing big about it. It`s just a proof to your self, that you have made some progress with that.

Now if you start comparing udemy to other online courses that are affiliated with known universities (like coursera and stanford online), and for which you have to sit proper exams and communicate with the teacher and stuff.. Then I suppose the situation might be slightly different, but again, i doubt it if that is something i would but in my resume.. Of course i have not managed to finish any such course. Yet.


SVN dump and load

Since a lot of time i use the tortoise svn with visualsvn as my developing repository.

I have it installed locally on the vmware that i use. The repositories are also created locally. At some point i needed a smart way to backup /copy all my repositories from the vmware to the Synology NAS I have sitting at home.  I used to sync all the repos through dropbox but took much time and was not fool proof. I ended up installing the SVN sever on the synology NAS.  After opening the right ports on ly router everything seemed to work ok, but how do you transfer the repo from the local machine to the nas svn???

First i exported the repositories from the local developing machine:

svnadmin dump E:\Wamp\Repositories\tharsitis.gr > E:\Wamp\Repositories\tharsitis.gr.dump

After creating an empty repository in the synology SVN, i copied the previously generated dump file in the synology SVN folder.

synology svn
synology svn


Now the loading…

Login via SSH with root rights on to the SVN and run the following:

where:

svnadmin load  /volume1/SVN/tharsitis.gr < /volume1/SVN/tharsitis.gr.dump --ignore-uuid

where  –ignore-uuid : ignore any repos UUID found in the stream

WTF is Semalt.com?

No Semalt
No Semalt

As soon as i installed the google analytics code for tharsitis.gr , found out that i got too many  hits from Brazil.  Digging a bit more in the analytics report,  found that all the brazilian hits were coming from semal.com…

Semalt.com is an Ukrainian company that crawls the internet and generates reports on how your site compares to the rest of the internet, or the competition. Simply as that. Now why it needs to crawl my wordpress blog 16 times a day, i do not know. I only have like 5 posts yet :).

Any how, if you want to prevent semalt.com from crawling your web site, there are a couple of ways you can do that. One of them is through the .htaccess file. For wordpress i have changed my htaccess file to below (added the lines after # END WordPress, got it from here):

# Switch rewrite engine off in case this was installed under HostPay.
RewriteEngine Off
SetEnv DEFAULT_PHP_VERSION 53
DirectoryIndex index.cgi index.php index.html
# BEGIN WordPress
<IfModule mod_rewrite.c>
RewriteEngine On
RewriteBase /
RewriteRule ^index\.php$ - [L]
RewriteCond %{REQUEST_FILENAME} !-f
RewriteCond %{REQUEST_FILENAME} !-d
RewriteRule . /index.php [L]
</IfModule>
# END WordPress
SetEnvIfNoCase Via evil-spam-proxy spammer=yes
SetEnvIfNoCase Referer evil-spam-domain.com spammer=yes
SetEnvIfNoCase Referer evil-spam-keyword spammer=yes
SetEnvIfNoCase Via pinappleproxy spammer=yes
SetEnvIfNoCase Referer semalt.com spammer=yes
SetEnvIfNoCase Referer poker spammer=yes
Order allow,deny
Allow from all
Deny from env=spammer

Alternatively you could also visit their web site and ask them to remove your page.. (it did not work for me).